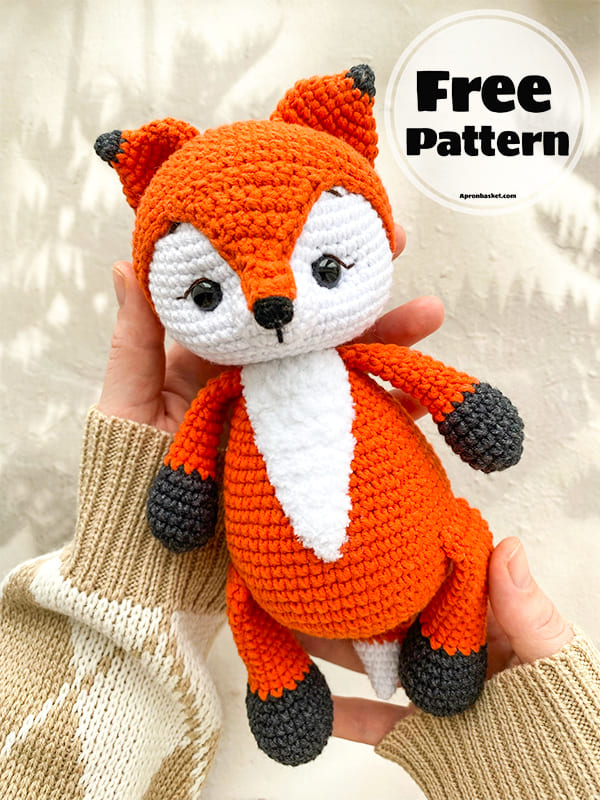
You are in the right place to make an easy crochet fox. I translated this amigurumi fox pattern for you, but if there are any mistakes, you can ask me. I will try to help as much as I can. This cute and easy crochet fox pattern will measure 23-24 cm when completed. The designer used YarnArt Jeans, Alize Softy yarn and a 2 – 2.25 mm crochet hook to make this adorable amigurumi fox. In the free fox amigurumi pattern, all parts are made separately and then fixed. After making the amigurumi fox, you can make a nice surprise for your child or use it as a decor in the children’s room. It can be placed on a table or by the window to create a nice atmosphere in your child’s room. Now let’s follow step by step how to make this beautiful fox. Keep reading my blog for more crochet animals.
Free Fox Amigurumi Pattern
Designer: krestinka_93
List of required materials:
1. Yarn Yarn Art Jeans (50 g/160 m):
– No. 85 – orange (slightly smaller than a skein)
– No. 01 – white;
– No. 53 – black;
– Yarn Alize Softy No. 55 (for breast)
2. Hook No. 2-2.25
3. A needle for sewing parts and a long needle for tightening the muzzle (I have a needle for documents);
4. Eyelets on a safe mount with a diameter of 10 mm;
6. Filling for a toy (I have synthetic fluff);
7. Scissors.
When using all recommended materials, the amigurumi fox toy is 23-24 cm high.
Abbreviations:
Sc: Single crochet
Dc: Double crochet
Hdc: Half double crochet
Inc: Increase
Dec: Decrease
Ch: Chain
Slst: Slip stitch
MR: Magic ring
Head (white):
1) 6 sc in MR
2) 6 inc (12)
3) (1 sc, inc) x 6 (18)
4) (2 sc, inc) x 6 (24)
5) (3 sc, inc) x 6 (30)
6) (4 sc, inc) x 6 (36)
7) (5 sc, inc) x 6 (42)
8) (13 sc, inc) x 3(45)
9) (14 sc, inc) x 3 (48)
10) (7 sc, inc) x 6 (54)
11) (17 sc, inc) x 3 (57)
12) (18 sc, inc) x 3 (60)
13-21) 60 sc – 9 rows
We insert the eyes between the 16th and 17th rows.
The distance between the of the eyes is 11 sc.
22) (8 sc, dec) x 6 (54)
23) (7 sc, dec) x 6 (48)
24) (6 sc, dec) x 6 (42)
25) (5 sc, dec) x 6 (36)
We’re starting to get stuffing.
26) (4 sc, dec) x 6 (30)
27) (3 sc, dec) x 6 (24)
28) (6 sc, dec) x 3 (21)
We cut off the thread and hide the tip. We stuff the head tightly as we knit.
Body:
1) 6 sc in MR
2) 6 inc (12)
3) (1 sc, inc) x 6 (18)
4) (2 sc, inc) x 6 (24)
5) (3 sc, inc) x 6 (30)
6) (4 sc, inc) x 6 (36)
7) (5 sc, inc) x 6 (42)
8) (6 sc, inc) x 6 (48)
9) (7 sc, inc) x 6 (54)
10) (8 sc, inc) x 6 (60)
11-13) 60 sc – 3 row
14) (18 sc, dec) x 3 (57)
15)57 sc
16) (17 sc, dec) x 3 (54)
17) 54 sc
18) (7 sc, dec) x 6 (48)
19) 48 sc
20) (6 sc, dec) x 6 (42)
21) 42 sc
We begin to fill the body.
22) (5 sc, dec) x 6 (36)
23-24) 36 sc- 2 rows
25) (4 sc, dec) x 6 (30)
26) 30 sc
27) (3 sc, dec) x 6 (24)
28) 24 sc
29) (6 sc, dec) x 3 (21)
30) 21sc , slst.
Cut the thread, leaving a long end. Sew the head to the body.
Now you need to tighten the head.
Muzzle (white):
1) 6 sc in MR
2) (1 sc, inc) x 3 (9)
3) (2 sc, inc) x 3 (12)
4) (3 sc, inc) x 3 (15)
5) (4 sc, inc) x 3, (18) slst. Cut the thread, leave the tip for sewing.
I advise you to immediately sew the muzzle between the 16th and 21st rows.
Head cape (orange color):
1) 6 sc in MR
2) 6 inc (12)
3) (1 sc, inc) x 6 (18)
4) (2 sc, inc) x 6 (24)
5) (3 sc, inc) x 6 (30)
6) (4 sc, inc) x 6 (36)
7) (5 sc, inc) x 6 (42)
8) (13 sc, inc) x 3(45)
9) (14 sc, inc) x 3 (48)
10) (7 sc, inc) x 6 (54)
11) (17 sc, inc) x 3 (57)
12) (18 sc, inc) x 3 (60)
13-17) 60 sc – 5 rows
18) 10 sc, 1 ch, turn
19) 9 sc, 1 ch, turn
20) 8 sc, 1 ch, turn
21) 7 sc, 1 ch, turn
22) 6 sc, 1 ch, turn
23) 5 sc, 1 ch, turn
24) 4sc, 1 ch, turn
25) 3 sc, 1 ch, turn
26-29) 2 sc, 1 ch, turn (you may need more or fewer rows, focus on your face).
30) inc, inc, then tie this section with turning rows with sc, reaching the base, knit the entire 17th row with slst, while it is better to put this cape on your head. The remaining second side of the section with the turning rows is tied with sc. Cut off the thread and hide the tip.
Upper legs (2 pieces):
Start crocheting with black thread.
1) 6 sc in MR
2) 6 inc (12)
3) (3 sc, inc) x 3 (15)
4-5) 15 sc
6) 1 dec, 2 sc, 1 dec, 9 sc (13)
7) 2 dec, 9 sc (11)
8) 1 dec, 9 sc (10)
Change the thread to a thread of the main color.
9-16) 10 sc – 8 rows
Next, fold it over both walls and crochet 5 sc, leaving a long tip for sewing.
Lower legs (2 pieces):
Start crocheting with black thread.
1) Make on 6 ch, start crocheting from the second loop from the hook: inc, 3 sc, 4 sc in one loop, 4 sc (13)
2) 2 inc, 2 sc, 6 inc, 2 sc, inc (22)
3) (1 sc, inc)x2 times, 2 sc, (1 sc, inc)x6 times, 3 sc, inc (31)
Crochet two offset stitches to the middle.
4-6) (3 rows): 31 sc (31)
7) dec, 29 sc (30)
8) 7 sc, 8 dec, 7 sc (22)
9) 7 sc, 4 dec, 7 sc (18)
10) 7 sc, 2 dec, 7 sc (16)
11) 7 sc, dec, 7 sc (15)
Change the thread to a thread of the main color.
12-20) (9 рядов): 15 sc (15)
Next, fold it over both walls and crochet 7 sc, leaving a long tip for sewing.
Tail:
Start crocheting with white thread.
1) 6 sc in MR
2) (1 sc, inc)x3 (9)
3) 9 sc
4) (2 sc, inc)x3 (12)
5) 12 sc
6) 1 sc, inc)x6 (18 )
7) (5 sc, inc)x3 (21)
Change the thread to a thread of the main color.
8-15) 21 sc 8 rows
16) (5 sc, dec)x3 (18)
17) 18 sc
18) (1 sc, dec)x6 (12)
19-20) 12 sc (2 rows)
21) (2 sc, dec)x3 (9)
Next, fold it over both walls and crochet 4 sc, leaving a long tip for sewing.
Ears (2 pieces):
Start crocheting with black thread.
1) 6 sc in MR
2) (1 sc, inc)x3 (9
Change the thread to a thread of the main color.
3) 9 sc
4) (2 sc, inc)x3 (12)
5) (1 sc, inc)x6 (18)
6) (2 sc, inc)x6, (24)
7-9) 24 sc, (3 rows),slst
Leave a long tail tip for sewing.
Breast
1) Make on 10 ch, starting from loop 2, 9 sc, 1 ch, turn.
2) 9 sc, turn,
3) 8 sc, 1ch, turn
4) 8 sc, turn
5) 7 sc, 1 ch, turn
6) 7 sc, turn,
7) 6 sc, 1 ch, turn
8) 6 sc, turn
9) 5 sc, 1ch, turn
10) 5 sc, turn
11) 4 sc, 1 ch, turn
12) 4 sc, turn
13) 3 sc, 1 ch, turn
14) 3 sc, turn
15) 2 sc, turn
16) 1 sc, leave thread for sewing.
Assembly:
1. Sew the upper legs between the 29th and 30th rows of the body.
2. Sew the lower legs between the 13th and 14th rows of the body. The distance between them is approximately 20 sc (it is better to navigate by the upper legs).
3. Sew the tail between the 11th and 12th rows of the body.
4. Embroider the nose with a triangle using black thread.
5. Embroider eyelashes and eyebrows with black thread.
6. Sew the ears approximately between 10-11 rows of the lining. The distance between the ears is 5-6 loops.

admin
Recommended To You