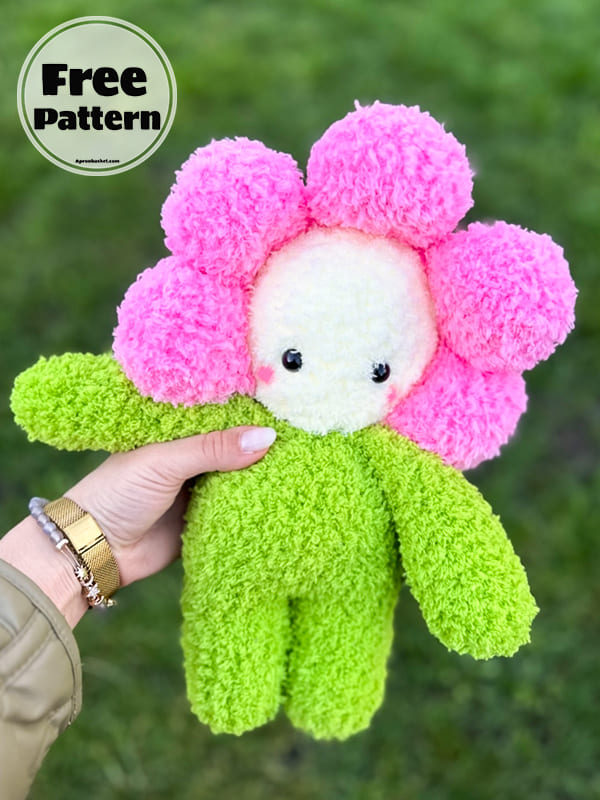
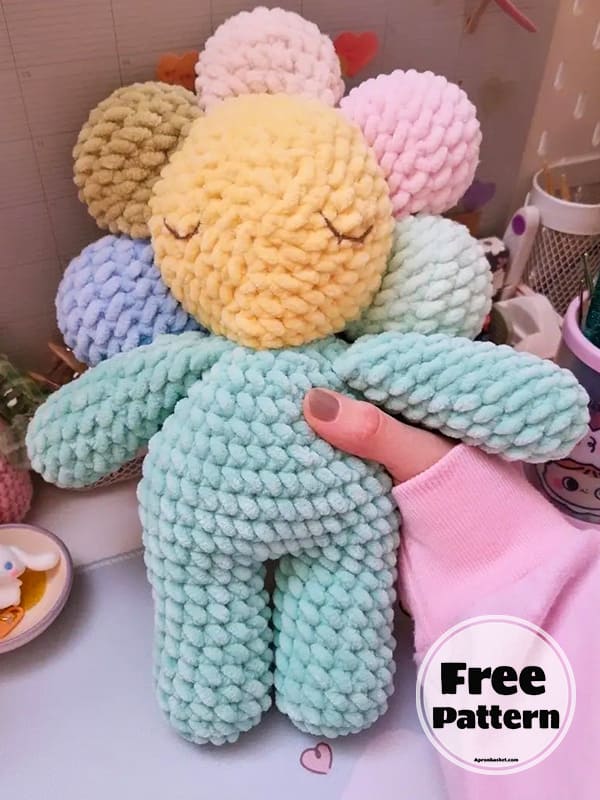
As spring is coming, let’s make a beautiful daisy crochet doll amigurumi patterns, shall we? Those who want to make a crochet amigurumi doll can consider such a daisy. I’m sure your kids will love it. It will be a doll that can be both a playmate and a playmate for them. You can make this amigurumi doll with any color thread you want. Colorful works can be created by using your imagination. You make the doll’s legs and body as a single piece. Then his arms and head remain. After doing these, you fix them on the body. That’s it. If you wish, you can make the daisy petals in different colors. So your daisy crochet doll can be special to you.
Daisy Crochet Amigurumi Doll Pattern
Designer: blue.beena
Terms and abbreviations
MR- Magic ring
Sc- Single crochet
Inc- Increase
Dec- Decrease
St- Stitch
FO- Fasten off
Slst- Slip stitch
What you will need
Yarn: for this pattern i strongly recommended to use a fuzzy / faux yarn, i used a thick thread fuzzy yarn however you are free to use any yarn you prefer even through this could affect the look of your make.
You will need at least one skein of yarn for each colour you will use, for my plush i will use 3 colour.
– Pink colour 1″
– Yellow colour 2″
– Green colour 3″
Crochet hook: make sure to select the right hook size based on the yarn you decide to use: i used a size 6 mm.
Safety eyes: with this pattern can use various eyes sizes, i decided to use 8 mm for my flower but even a bigger size like a 16 or 20 would have suit nicely.
In alternative you can embroider them or use felt eyes.
Yarn needle: this pattern is quite low sew, however you will need a yarn needle to sew some parts together.
Poly-fill stuffing.
Petals (make 5)
In colour 1.
R1. 7 sc in MR
R2. inc around (14)
R3. (sc,inc)*7 (21)
R4-6. sc around (21) *3rnds*
R7. (sc,dec)*7 (14)
R8. sc around (14)
Slightly stuff (or stuff firmly if you want the petals to stay still on the plushie).
Fold the petal and make 7 slst across both sides.
Arms (make 2)
In colour 3.
R1. 6 sc in MR
R2. inc around (12)
R3-7. sc around (12) *5rnds*
R8. (4sc,dec)*2 (10)
R9-12. sc around (10) *4 rnds*
Add stuffing.
Fold both sides and make 5 slst across.
FO, leave a long tail to sew.
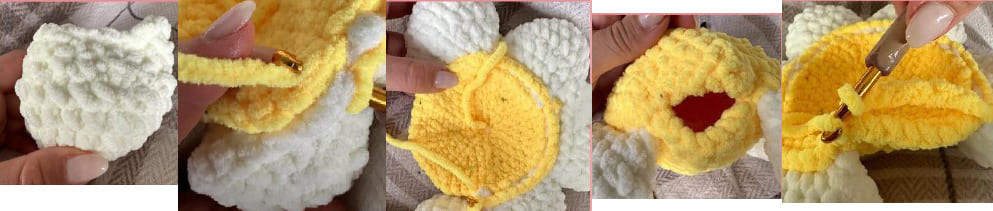
Head
In colour 2.
R1. 7 sc in MR
R2. inc around (14)
R3. (sc,inc)*7 (21)
R4. (2sc,inc)*7 (28)
R5. (3sc,inc)*7 (35)
R6. (4sc,inc)*6, 4 slst, inc (42)
Add safety eyes between R3/4 (it might depend on the size of the eyes) opposite to each other.
R7. Attach petal 1 with 7 slst, attach petal 2 with 7 slst, attach petal 3 with 7 slst, attach petal 4 with 7 slst, attach petal 5 with 7 slst, ch 7 and skip 6 st from the head, slst in the next stitch.
R8. sc around (42)
R9. (4sc,dec)*7 (35)
R10. (3sc,dec)*7 (28)
Stuff.
R11. (2sc,dec)*7 (21)
R12. (sc,dec)*7 (14)
R13. dec around (7), You can avoid this around and sew close after the previous one.
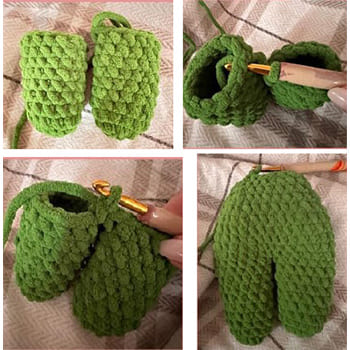
Legs and body
In colour 3.
R1. 7 sc in MR
R2. inc around (14)
R3-10. sc around (14) *8rnds*
Fasten off for the first leg.
Do not fasten off, for the second leg but sc in any st of leg 1 (this is the first sc of R 11) from there we will start making the body.
R11. 14 sc, sc in the ch, 14 sc, sc in the ch (30)
R12. (4sc,inc)*6 (36)
Stuff legs.
R13-16. sc around (36) *4rnds*
R17. (7sc,dec)*4 (32)
R18. (6sc,dec)*4 (28)
R19. sc around (28)
Stuff.
R20. (2sc,dec)*7 (21)
R21. (sc,dec)*7 (14)
Add some more stuffing.
Slst fasten off, leave a long tail to attach the head.
Assembly
Attach the head to the body by using the tail you left on the body, the stitches of lasts row of both parts match each other so it shoul be easy to connect them.
Sew the arms between the body and the head on each side of the plushie, under the petals.
Embroider some blush to make your plushie even cuter.

admin
Recommended To You