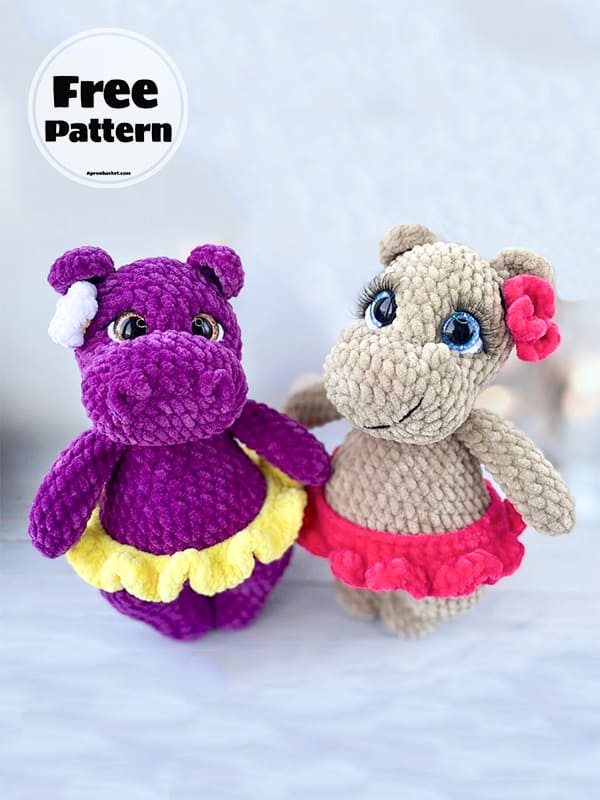
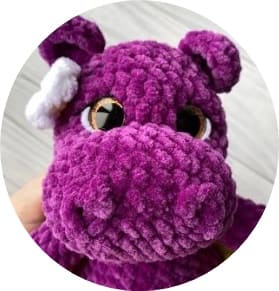
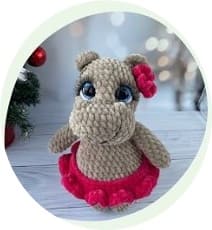
The crochet hippo pattern in 2 different characters is here for free and as PDF. I would like to thank our designer for bringing us this wonderful crocheted hippo pattern. The cute amigurumi hippo has a beautiful skirt around his waist and a crochet flower in his ear. To make the hippo’s butt, which is one of its most distinctive features, you need to fill it with as much filling material as necessary. If you are having difficulty with how to do these, there is no need to worry. The designer has published an instructional video showing you how to do it step by step. You can check out his YouTube account for this. Stay tuned for always the best crochet animals. Now you can follow how to make this wonderful crochet hippo below.
Plush Crochet Hippo Pattern Free
Designer: rosalie_toys
Materials and tools
• Hook: 4 mm.
• Yarns:
• Main body color- Himalaya dolphin baby (71 g).
• Secondary color- Himalaya dolphin baby for a skirt and a flower.
• 16 mm or 18 mm safety eyes.
• Yarn needle.
• Scissors.
• Holowfiber.
• Stitch marker.
Abbreviations
MR- Magic ring
Ch- Chain
Slst- Slip stitch
Sc- Single crochet
Dec- Decrease
Inc- Increase
BLO- Back loop only
Dc- Double crochet
Hdc- Half double crochet
Hdcinc- Half double crochet increase (2 hdc in one st)
BBL- Bobble stitch (3 double crochet bbl st)
Head
R1. ch 6, from the 2nd ch from the hook: 4 sc, 4 sc in the last ch, 3 sc, 3 sc in the last ch (14)
R2. inc, 3 sc, 4 inc, 3 sc, 3 inc (22)
R3. sc, inc, 3sc, (sc,inc)*4, 3sc, (sc,inc)*3 (30)
R4. 30 sc
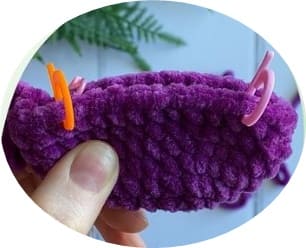
Next, you can make the nostrils in 2 ways.
First option: R5. 30 sc (see pic 1. we will make the nostrils later).
Second option: R5. 16 sc, BBL, 6 sc, BBL, 6 sc (30) (see pic 2.).

Adjust if necessary.
R6. 12 sc, dec, 13 sc, dec, 1 sc (28)
R7. 15 sc, (hdc, hdcinc)*4, hdc, 4 sc (32)
Hdc’s should be in the middle of the snout, adjust if necessary, see pic. Make the hdc’s very tight so that there are no holes.
R8. sc, dec, 5 sc, dec, 2 sc, dec, 2 sc, hdc, hdcinc, 6 hdc, hdcinc, hdc, 4 sc, dec (30)
R9. 14 sc, hdc, hdcinc, 7 hdc, hdcinc, hdc, 5 sc (32)
R10. 17 sc, inc, 5 sc, inc, 8 sc (34)
R11. 34 sc
Place the eyes between rows 8 and 9, about 4 visible sts apart.
R12. 20 sc, inc, sc, inc, 11 sc (36)
R13-14. 36 sc around (2 rows)
R15. (4sc,dec)*6 (30)
R16. (3sc,dec)*6 (24) starting to stuff.
R17. (2sc,dec)*6 (18)
R18. (sc,dec)*6 (12)
R19. 6 dec
Cut the yarn, close the hole.
Ears (make 2)
R1. 5 sc in a MR
R2. 2 inc, hdcinc, 2 inc (10)
R3. 4 sc, 2 hdc, 4 sc (10)
Cut the yarn, fasten off, leaving a tail for sewing.
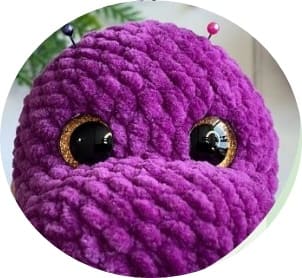
Place the ears between R14 and R15 (see pic 1).
Nostrils
First, mark with pins where the nostrils will be (see pic 2).
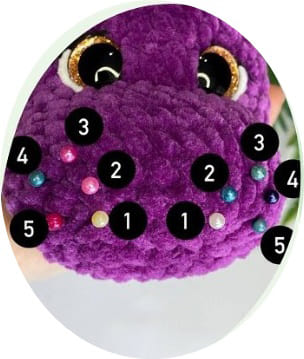
Insert your hook from the 1st pin to the 2nd pin. Pull up the yarn and make a slst.
Insert your hook again this time from where the 2nd pin used to be to the 3 and make a slst.
Repeat to the end.
Bring starting and end tail to the same point and make 2 knots.
Arms (make 2)
R1. 5 sc in a MR
R2. 5 inc (10)
R3-12. 10 sc (10 rows), slst
Stuff lightly.
Fold in half and crochet 5 sc through both sides.
Legs (make 2)
R1. 8 sc in a MR
R2. (sc,inc)*4 (12)
R3-6. 12 sc (4 rows)
R7. (2sc,inc)*4 (16)
Fasten off, after the 1st leg, but do not fasten off, after the 2nd leg.
You will be connecting them and continuing on to the body.
2 ch after finishing the 2nd leg. Attach legs by 16 sc around the 1st leg, 2 sc into the ch, 16 sc on the 2nd leg and sc on the ch.
Body
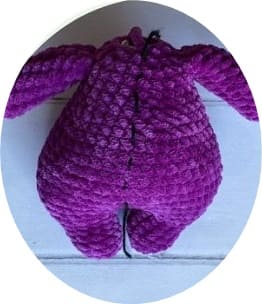
Now we are going to put a marker to mark the center.
I am using a contrasting thread. Then we continue with the body and this will be the first row. So the row numbering starts again.
R1. sc on the ch, (2sc,inc)*5, 3 inc, (2sc,inc)*4, sc, 3 inc (50)
R2. 2 inc, 20 sc, (inc,sc)*2, 24 sc (54)
R3. 25 sc, inc, 2 sc, inc, 25 sc (56)
The increases must fall on the increases of the 2nd row; adjust if necessary.
R4. 54 sc around
Keep your eye on the marker and ensure it goes straight down the middle of the back.
Adjust it by offsetting the stitch.(see pic).
R5. 8 sc, (sc,dec)*3, 19sc, (dec,sc)*3, 11 sc (50)
R6. 8 sc, (sc,dec)*3, 14sc, (dec,sc)*3, 10 sc (44)
R7. (5sc,dec)*2, 10 sc, (5sc,dec)*2, 6 sc (40)
Start stuffing. Stuff the body as you go.
Ensure the body is stuffed firmly, paying attention to the shape.
If too little stuffing is used, the hippo will lack the characteristic hips and belly.
R8-9. 40 sc around (2 rows)
R10. (6sc,dec)*5 (35)
R11. (5sc,dec)*5 (30)
R12. 30 sc around
R13. (3sc,dec)*6 (24)
R14. 24 sc around
R15. 4 sc, 5 sc tog with arm, 6 sc, 5 sc tog with arm, 4 sc (24)
Offset the stitch if necessary to ensure that the arms are symmetrically positioned.
R16. (2sc,dec)*6 (18)
R17. (sc,dec)*6 (12), slst.
Cut the yarn, leaving a tail for sewing.
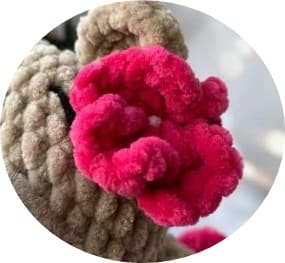
Flower
Ch 4, in the 4th ch from hook:
2 dc 3 ch, slst.
Next: (ch 3, 2 dc, 3 ch, slst)*3
(All the petals are crochet into the 4th loop)
Cut the yarn, leaving a tail for sewing.
Skirt
R1. Ch 44. Make a slip stitch in the last loop of the hook (at the beginning of the chain), thus closing the circle.
I offer you two skirt options.
Tip: You can make ch. 43 if you feel that skirt is too big.
1st option:
R2-3. 44 sc around (2 rows)
R4. (2 hdc in one st, 3 hdc in one st)
Repeat to the end of the row, slst.
Cut the yarn, fasten off. (pic 1).
2nd option:
R2. 44 sc around
R3. (3 hdc in one st)* repeat to the end of the row, slst.
Cut the yarn, fasten off. (pic 2).

Crochet hippo is ready, if you have difficulty in assembly and embroidery, you can watch how it is done on the designer’s YouTube channel.

admin
Recommended To You