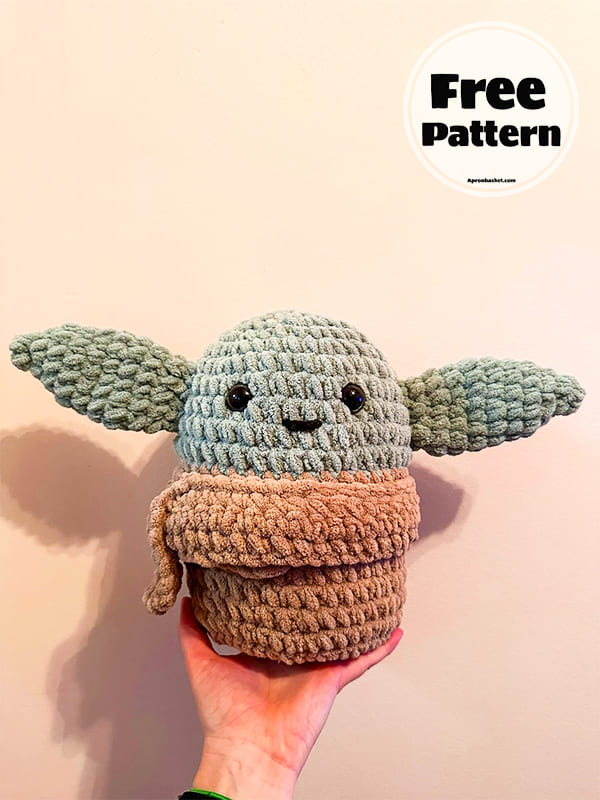
Very easy to make and soft baby yoda crochet pattern is here now for free. Since chenille yarn is used, your children will love its very soft texture. Crochet baby yoda amigurumi toys are generally very popular. I can say that this is a very nice work. Thanks to its round structure, it can be your children’s sleeping companion. Isn’t it a nice idea?
To make the baby yoda crochet pattern, first you make the body. It already consists entirely of the body. Next, his ears and cape remain. After completing them, you fix them to the body. For the eyes of the crocheted yoda, 20 or 25 mm ready-made safe eyes were used.
Baby Yoda Crochet Pattern
Designer: goomba.crochets
Abbreviations
MR- Magic ring
St- Stitch
Ch- Chain
FO- Fasten off
Sc- Single crochet
Slst- Slip stitch
Inc- Increase
Dec- Decrease
Materials and tools
– Light green yarn
– Tan yarn
– Safety eyes
– Fiber fill
– Crochet hook
– Darning needle
– Black yarn for mouth
Body
Starting with light green yarn:
R1. 6 sc in MR (6)
R2. (inc)x6 (12)
R3. (sc,inc)x6 (18)
R4. (2sc,inc)x6 (24)
R5. (3sc,inc)x6 (30)
R6. (4sc,inc)x6 (36)
R7. (5sc,inc)x6 (42)
R8-11. sc around (42)
Change to tan yarn:
R12. sc around (42)
R13. BLO- sc around (42)
R14-17. sc around (42)
R18. (6sc,inc)x6 (48)
R19. (7sc,inc)x6 (54)
R20. sc around (54)
Insert eyes between rounds 8-9, 6-7 stitches apart.
Begin to stuff.
R21. (dec)x27 (27)
R22. (decx13), 1 sc (14)
Finish stuffing.
R23. (dec)x7 (7)
FO, and sew in loose ends.
Ears (make 2)
R1. 4 sc in MR (4)
R2. (sc,inc)x2 (6)
R3. (inc)x6 (12)
R4-5. sc around (12)
R6. (3sc,inc)x3 (15)
R7. sc around (15)
R8. (3sc,dec)x3 (12)
R9. sc around (12)
R10. (2sc,dec)x (9)
Fold ear in half and 4 sc across.
FO, leaving a tail for sewing.
Cloak
R1. Ch 60 or 50 if you do not want a fold (see picture for reference).
R2-4. Ch 1, turn, and sc across.
FO, leave a long enough tail to hide the ends.
You will not need to sew the cloak on.

Assembly
– To attach the cloak, insert your hook with a slip knot about 7 stitches away from the eyes in the back loop of round 13 with tan yarn (see picture #1).

– Slst around the whole plushie, inserting your hook in both the tan cloak piece and in the back loop. If you chained 60, fold over the excess and sew down (see picture #2).

– Sew the ears on about 5-6 stitches away from the eyes, with the top of the ear starting on row 7, and ending just above the cloak, tilted inward (see picture #3).

– Sew on a mouth with black yarn between rows 9-10.

admin
Recommended To You