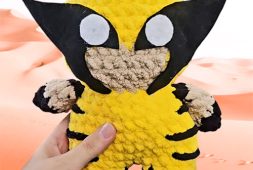
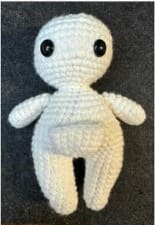
I continue with the mushroom girl from the free crochet doll patterns. A while ago, I shared with you amigurumi doll mushroom boy. Now the girl version has arrived. It is combined with very cute colors and has a beautiful flower pattern on the mushroom hat. Likewise, it is very easy to make this mushroom girl. First, you start with his legs and continue with his body. Then you make the arms, head and mushroom hat. Everything is made and fixed separately. Our designer chose rainbow colors for the mushroom hat, but you can only make it with red and white dots. Stay tuned for more crochet doll patterns.
Mushroom Girl Crochet Doll Pattern
Designer: aliwingcrochets
Materials
Approx. 4oz medium (No. 4) white yarn for the main body.
Approx. 2oz medium (No. 4) rainbow yarn for the cap.
Small amount of light (No. 3) pink yarn for the flower accessory.
Peach & Black Wool & Felting Needles
4.0mm & 3.0mm crochet hooks
Stuffing
Darning/Tapestry needle
Scissors
Safety Eyes
Abbreviations
Pattern is in US terminology:
ch- chain
sc- single crochet
hdc- half double crochet
dc- double crochet
sl st- slip stitich
mr- magic ring
inc- increase
dec- decrease
inv- invisible
FO- fasten off
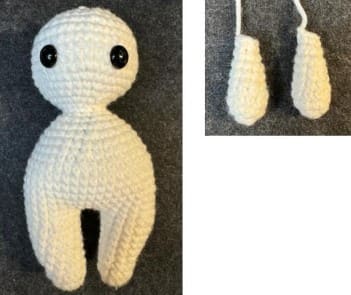
Legs – Make 2
Using medium white yarn…
1. 6 sc in MR (6)
2. (1 sc, inc) x 3 (9)
3. sc all around (9)
4. sc all around (9)
5. inc, inc, 7sc (11)
6. inc, inc 9sc (13)
7. 3sc, inc, 9sc (14)
8. sc all around (14)
9. 3sc, inc, 10sc (15)
10. sc all around (15)
*FO the first leg, but don’t FO the second leg.
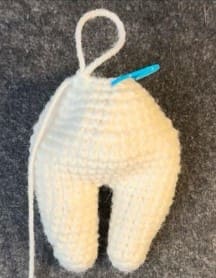
Body
1. Join the legs. Ch2 on 2nd leg, join with first leg. 15sc on first leg, 2sc in the chains, 15sc on second leg, 2sc in chains (34)
2. (7sc, inc) x4, sc2 (38)
3. (18sc, inc) x2 (40)
4. sc all around (40)
5. (8sc, dec) x4 (36)
6. (7sc, dec) x4 (32) Stuff the legs.
7. sc all around (32)
8. (6sc, dec) x4 (28)
9. (5sc, dec) x4 (24) Start stuffing the body.
10. (4sc, dec) x4 (20)
11. (2sc, dec) x5 (15)
12. (3sc, dec) x3 (12)
Head
Continuing from the body. Using medium white yarn.
1. (1sc, inc) x6 (18)
2. (2sc, inc) x6 (24)
3. (3sc, inc) x6 (30)
4. (4sc, inc) x6 (36)
5. (5sc, inc) x6 (42)
6-10. sc all around (42)
Insert eyes between rounds 7 and 8, spaced about 8 stitches apart.
11. (5sc, dec) x6 (36)
12. (4sc, dec) x6 (30)
13. (3sc, dec) x6 (24)
14. (2sc, dec) x6 (18)
15. (1sc, dec) x6 (12)
Start stuffing the head.
16. dec x 6, finish off
Arms – make 2
Using medium white yarn.
1. 6 sc in MR (6)
2. (1sc,inc)x3 (9)
3-7. sc all around (12)
Stuff the arm.
8. (1sc,dec)x3 (9)
9. sc all around (6)
Stuff some more if desired. Finish off and leave a long tail for sewing.
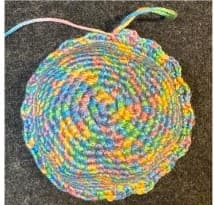
Cap
Using medium rainbow yarn…
1. 6sc in MR (6)
2. inc x6 (12)
3. (1sc, inc) x6 (18)
4. (2sc, inc) x6 (24)
5. (3sc, inc) x6 (30)
6. (4sc, inc) x6 (36)
7. (5sc, inc) x6 (42)
8. (6sc, inc) x6 (48)
9. (7sc, inc) x6 (54)
10-15. sc all around (54)
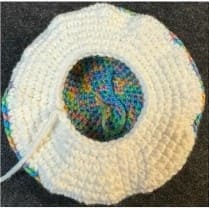
16. (1sc, 3 hdc in next stitch, 1sc) x18 (72)
17. sc all around (90)
Using medium white yarn.
18. switch to white yarn and sc all around into the back loop only (90)
19. (3sc, dec) x 18 (72)
20. (4sc, dec) x 12 (60)
21. (8sc, dec) x6 (54)
22. (4sc, dec) x9 (45)
23. (7sc, dec) x5 (40)
24. (8sc, dec) x4 (36)
FO and leave a long tail for sewing onto the head.
Using medium white yarn.
1. 6sc in MR (6)
2. inc x 6 (12)
3. (3sc, inc) x3 (15)
4-6. sc all around. Finish off and leave tail for sewing.
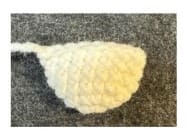
Flower
Using light pink yarn.
1. 5sc in MR, ch1
2. slip stitch into the first sc, then (1hdc, 3dc, 1hdc) into the first sc. This is one petal.
3. Repeat step 2 in the remaining 4sc of MR. There were 5sc in MR, so you should have 5 petals total.
4. Slip stitch to the ch1 and finish off and leave tail for sewing. Hide the short tail from the MR in the backside of the flower.
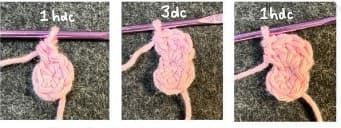
(1hdc, 3dc, 1hdc)into the first sc= one petal.
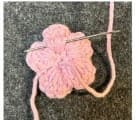
Hiding short tail from the MR in the backside of flower.
Assembly
• Sew the pocket on the tummy. Be creative with the pocket. You can put anything in the pocket or even make a tiny mushroom to go into the pocket.. etc. This is really for you customize your project.
• Sew the arms on the body. I sewed the arms about 2-3 rounds down from the neck.
• Sew the mushroom cap to the head and lightly stuff near the end as you’re about to finish. I you stuff too much filling the cap may look like a chef hat instead. Play with the amount of filling until you are satisfied before sewing shut. The white underside of the cap has 36 stitches which should correspond to the 36 stitches on the 6th round counting down from the top of the head. I sewed each stitch of the head to the back loop of the cap.
• Sew or glue the flower to the head.
• Needle felt the blush and mouth.
Pocket and arms.
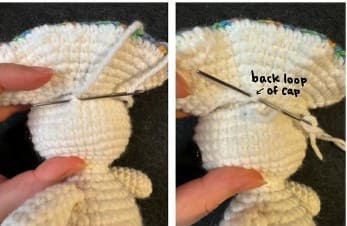
I sewed each stitch of the head to the back loop of the cap.
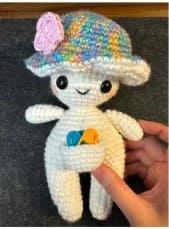
Completed assembly.

admin
Recommended To You